Installing applications on XBMC Live is actually much easier than you might think. It does require bashing out some code on a shell prompt, but it’s relatively easy. You can access the shell via two methods: directly from the XBMC-live machine or remotely via SSH. See below for the details on both methods.
Before I start the instructions on how to install, I’d like to give a plug for two other applications which pair up perfectly with SABnzbd: NewzBook and SickBeard. NewzBook is an application I wrote for managing my downloads and files remotely. (install instructions | info) NewzBook includes a mobile friendly website that allows you to search for content and start downloading it remotely — it also includes a web based media player and file manager. SickBeard is an amazing PVR app written by someone else and it heavily simplifies my life. (install instructions | info) Simply tell SickBeard what shows you want to watch and it will automatically go out and search the major indexers and download new versions of the TV shows as they come out. SickBeard can also index all your content locally so it can then download updated / better versions as they come available — for example, you might have a few episodes in SD quality and you can have SickBeard automatically check for HD versions.
Directly from the Machine
To access the shell directly from the machine, you will need to plug in a keyboard to the xbmc box then switch to a different window/desktop. You can switch to a different window by pressing Ctrl+Alt+F#. Most people typically recommend switching to window two by pressing Ctrl+Alt+F2. When you are finished (or even if you just need to switch back temporarily), you can get back to the main XBMC window by going to window 7 (Ctrl+Alt+F7).
Via SSH
I personally prefer to use SSH as it keeps me untethered from the box. My XBMC machine is in a media cabinet, so I don’t keep the keyboard connected and don’t like having to pull one out. Most people will probably want to follow along with this blog post while they do the steps anyway so it’s probably just easier to use SSH for you as well. If you don’t already have an SSH client, I would recommend puttyTRAY. You can download it by visiting this website, then dragging the large icon from the left to the right.
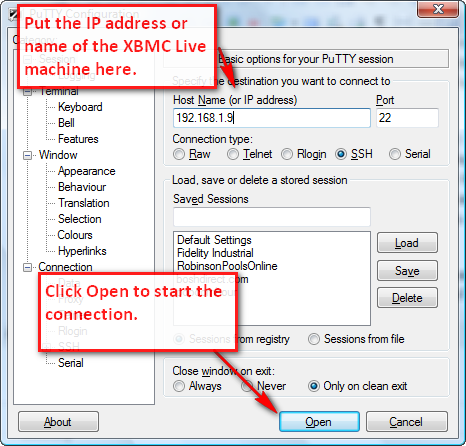
To access the box via SSH, open up putty then enter the IP address (or name) of your XBMC Live machine in the Host Name box. The default port 22 and connection type of SSH will work. Press the open button at the bottom to connect.
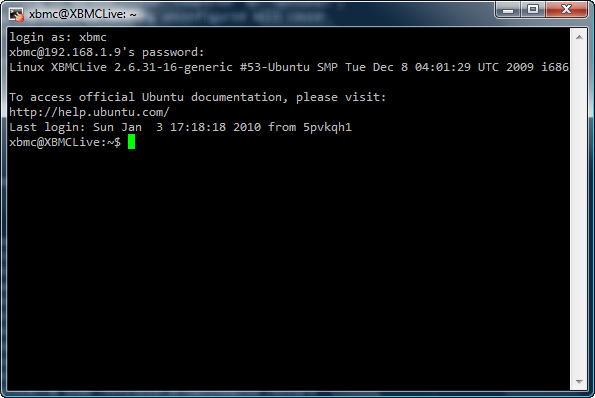
At this point you will be prompted for a username (then the password). By default this is XBMC/XBMC, but if you may have selected something different during installation. When you type the password, you won’t see the cursor moving. Don’t worry, it is getting what you are typing but it hides passwords. After entering the username and password, you will get to a window that looks similar to the following:
SABnzbd+ Installation
At this point, you are now connected to the shell (either via SSH or directly on the machine). Use the following instructions to update your apt-get repository and install SABnzbd+.
- Update the repository (not necessary, but a good idea):
sudo apt-get update
- Install the application. Type the following at the command prompt, then enter the password of the super account (if you are prompted for it) and type “Y” when prompted to continue. The system will automatically grab all the dependencies and install them for you.
sudo apt-get install sabnzbdplus
- Configure the base application. If you read through the messages from the apt-get installation, you’ll see a line that says “Not configured, aborting. See /etc/default/sabnzbdplus”. This means we need to setup the configuration (via command line) before we can start the main application. We’ll do this using a basic editor called nano (you can use vi or emacs if you prefer them). We’ll use the sudo command so we can ensure we edit the file with an account with appropriate access.
sudo nano /etc/default/sabnzbdplus
You should now see a file that looks similar to the following on your screen:
# This file is sourced by /etc/init.d/sabnzbdplus
#
# When SABnzbd+ is started using the init script, the
# --daemon option is always used, and the program is
# started under the account of $USER, as set below.
#
# Each setting is marked either "required" or "optional";
# leaving any required setting unconfigured will cause
# the service to not start.

# [required] user or uid of account to run the program as:
USER=xbmc

# [optional] full path to the configuration file of your choice;
#            otherwise, the default location (in $USER's home
#            directory) is used:
CONFIG=

# [optional] hostname/ip and port number to listen on:
HOST=
PORT=8080

# [optional] extra command line options, if any:
EXTRAOPTS=
You’ll need to change two settings to get the application to work properly: USER and PORT. I usually just set the USER to the account XBMC runs on by default ‘XBMC’ and set the PORT to ‘8080’. This means you will later access the web interface via http://XBMCIP:8080/sabnzbd/
- Press Ctrl+O (then enter) to save the file, then Ctrl+X to exit out of the editor.
- Restart the SABnzbd service with our new configuration. Type the following to restart the service.
sudo /etc/init.d/sabnzbdplus restart
- You now have the application installed and the baseline configured. You can now access the web interface via http://XBMCIP:8080/sabnzbd/ (where XBMCIP is the IP address of your XBMC machine)
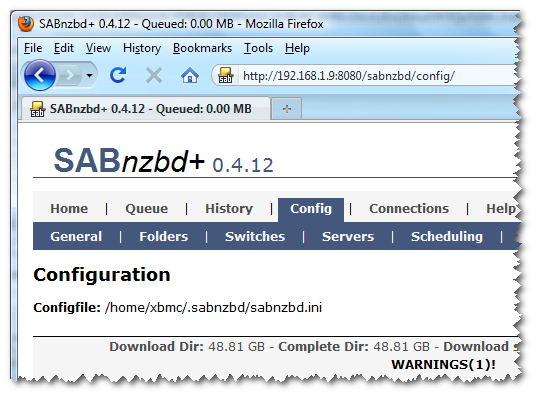
- You can configure the rest of the settings via the web interface. Just click on the configuration tab of the web interface (http://XBMCIP:8080/sabnzbd/)
Other Thoughts
If you don’t already have a usenet provider, I would highly recommend Astraweb. They often have a special for 11.99 which can typically be found by googling ‘Astraweb Special’.
There is also an XBMC plugin which I haven’t fully tested which you can find on this thread on the SABnzbd+ forums. The latest version at the time of writing this is 1.5.4 and can simply be unpacked into the /home/xbmc/.xbmc/plugins/programs folder then run from the Programs tab of XBMC.
You can install three more themes for SABnzbd+ using the sudo apt-get install method used above.
- sabnzbdplus-theme-iphone – iphone interface templates for the SABnzbd+ binary newsgrabber
- sabnzbdplus-theme-plush – plush interface templates for the SABnzbd+ binary newsgrabber
- sabnzbdplus-theme-smpl – smpl interface templates for the SABnzbd+ binary newsgrabber
- sabnzbdplus-theme-mobile – mobile (phone) interface
For example, to install the iphone interface, use:
sudo apt-get install sabnzbdplus-theme-iphone
Just like above it will ask you to enter the password for the super account (XBMC) if you haven’t already used the sudo function in your current session… and it will require you to press ‘Y’ to install the package.
In my installation, I’ve also made sabnzbd available via my main apache webserver which I use to serve up other apps on my XBMC server. If you are interested in serving SABnzbd via apache (reverse proxy), check out this article.
Leave a Reply