Have you ever wanted to have a single URL with a standard web port to access all the web services you run on your NAS? Most consumer Network Attached Storage (NAS) devices come with a built-in web server which can be used to share all of your services under one address.
Summary
How does this work you might ask? Web servers can route traffic to other servers using what’s called a “Reverse Proxy.” A proxy is a server or device which can act as an intermediary for other devices. In this case, the web server in your NAS can proxy traffic from other web servers on the same machine or even in the network. This allows you to have a single base URL like http://myserver.com which you can use for all your traffic. Each of your servers will then either be accessible via a subdomain or path.
Subdomain
Path
Challenge
In a typical setup, you would open up a port on your router for each and every server or device you want to access outside your network. In this case, your when you setup port forwarding on your network, your router is proxying the connections from outside your network to devices inside your network. The downside with this approach is you need to open a port for each and every server on your network and if any of those devices share the same port, you will only be able to forward traffic for one of the devices or you’ll have to forward a non-standard port.
Additionally, some networks like work or public networks will block non-standard ports. This means that if your server runs on a high port number like 5050 or 8989, it’s possible that this port will be blocked on other networks you might use. Using a reverse proxy, you can use a standard web port which should be open on a normal network (80=http, 443=https).
How-to (QNAP)
In this example, I’ll show how to setup an HTTP Reverse Proxy on a QNAP NAS using the built-in webserver, Apache.
Note: The same general concepts of modifying the Apache configuration file applies to other devices as well, but you may need to find the location of your configuration file.
Update: I have switched from Apache to Traefik as a reverse proxy on QNAP. Updating the built-in Apache configuration on QNAP has become increasingly difficult and the introduction of containers on QNAP has made the use of packages like Traefik much more approachable.
I’ve left the remainder of this blog post available as the concepts from this article apply to using Apache as a reverse proxy on other systems as well.
We will setup a reverse proxy to allow access to the following servers:
- http://myserver.com:8989 → http://myserver.com/sonar
- http://myserver.com:5050 → http://myserver.com/couch
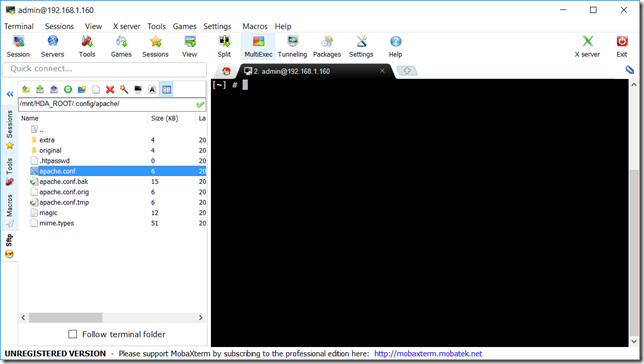
To do this, we will start by remoting into our NAS using SSH. If you don’t already have an SSH client, consider using Mobaterm which has an SSH and SFTP client all built into one.
- Open your SFTP client and connect to your NAS IP address.
- Navigate to
/mnt/HDA_ROOT/.config/apache/

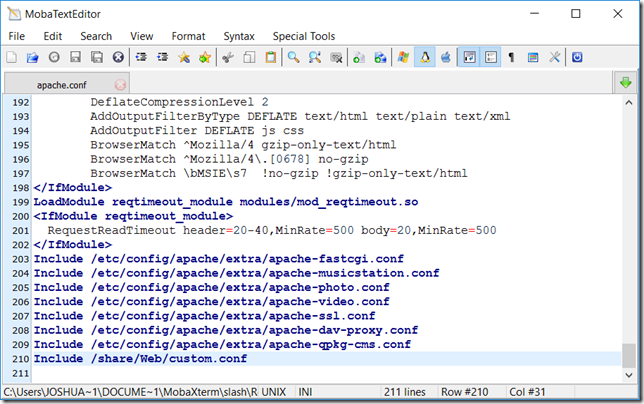
- Open/Edit your
apache.conffile, scroll to the bottom and add the following line:Include /share/Web/custom.conf
Note: You can also include the contents of the custom.conf (below) directly in your apache.conf file, but some NAS devices will completely reset the apache.conf file upon reboot. By using an external file, you can quickly ‘fix’ things after a reboot by adding the single “Include” line. - Save the file and choose ‘Yes’ to upload it back to the NAS
- Navigate to
/share/Web/and create a new file calledcustom.conf - Open/Edit the newly created custom.conf file and add the following details
#Customizations for reverse proxy
LoadModule proxy_module modules/mod_proxy.so
LoadModule proxy_http_module modules/mod_proxy_http.so
ProxyPass http://localhost:8989/sonarr
ProxyPassReverse http://localhost:8989/sonarr
ProxyPass http://localhost:5050/couchpotato
ProxyPassReverse http://localhost:5050/couchpotato
Note: The path in the location tag is the path you want to use to access the server. The URL inside the location tag is the current target URL of the server. Also note that some applications will require you to set a ‘Url Base’ in the General/Server advanced settings as shown in the example here for the target URLs.
- Save the file and choose ‘Yes’ to upload it back to the NAS
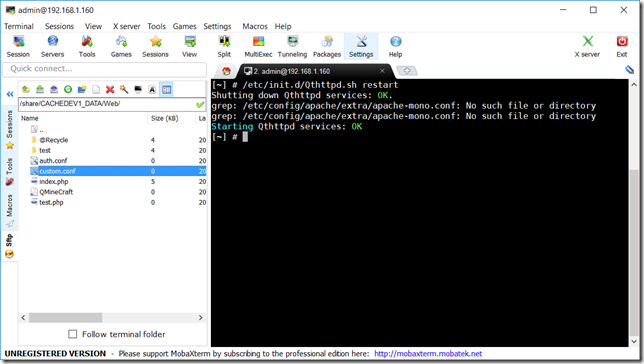
- From the SSH interface (right side of Mobaterm), enter the following command and press Enter:
/etc/init.d/Qthttpd.sh restart
Congratulations! You’ve now setup your reverse proxy and can access your servers at the desired URLs!

Leave a Reply