What is an Azure Queue?
Azure Queues allow you to store a large number of lightweight messages leveraging Azure Storage. Typical use cases for queues include buffering a set of data or actions for processing. And since the Queues are part of Azure Storage they are super cheap. As of writing this, each queue message can be 64 KB in size and a queue can hold millions of messages (up to the capacity of the storage account).
Examples:
Scott Hanselman has a post showing how an Azure Queue can be used along with Azure WebJobs to offload processing of images. This is a great example as it shows how a real application might accept images from a user in real-time, then use a queue as the hand-off for another service to actually process the images.
As another example, I have used Queues as a temporary staging ground for incoming IoT data from my connected SmartHome where a WebJob then took care of properly sorting the data and moving it to the destination Azure Table Storage location. This allowed me to take advantage of the massively scalable architecture of Azure Queues instead of having my logic running on a Web App where I would have had to take care of scalability.
How can I access the Queue?
Like many other things in Azure, Queues can be accessed through a REST API which is what we will cover in this post. Microsoft has also put together a number of wrapper APIs for .NET, Java, PHP, Node.js, Python, and Ruby which allow you to work with native language constructs and objects while the API takes care of interfacing with the REST API.
Regarding authentication, in order to access resources like Queues on Azure, you can:
- Make the Queue public
- Use your Primary or Secondary storage account key
- Build a custom application / service to proxy requests
- Generate and use a Shared Access Signature (SAS)
For the purposes of this post, we are going to assume an example where we want to be able to limit access to the Queue – that means making the queue public is not an option. And if we have full control of the application using the queues, then perhaps using the Primary or Secondary storage account key is sufficient. But what if we don’t have control of the application – for example, it’s running in a scripting language on a third party server. We might consider building a custom web application or service to proxy the requests, but now we have to deal with scalability and an additional layer of code when all we want to do is allow another application to add to the queue.
This is where Shared Access Signatures come in…
What does a Shared Access Signature do?
Shared Access Signatures allow us grant limited access to the queue without having to expose our main storage account keys or build a custom service. Even better, Shared Access Signatures allow us to grant specific permissions on the queue for a limited set of time. For example, we might want to issue a SAS that allows a client to only PUT new items on the queue (but not read/delete) and only allow this access for the next hour. We can generate a SAS and share it with the client and they will be able to PUT new items on the queue for the next hour and we no longer have to worry about the Primary or Secondary storage account key being exposed or being used for malicious intent if it falls into the wrong hands.
Microsoft has a great post explaining how Shared Access Signatures work and why you would use them if you want more information.
How do I use a Shared Access Signature (SAS)?
First, you’ll need to generate a Shared Access Signature. The specification is fairly straightforward, but it has a number of components to it and can be frustrating to work with if you are just trying to use a one-off SAS without worrying about all the details of generating a SAS. And if you want to create a service that generates SAS tokens, Microsoft has a good article including working C# code just for you.
If you just want a quick app that will generate SAS tokens for you, check out Azure SAS Generator on the Windows store.
Here’s a few types when generating the SAS:
- Try using the 2012-02-12 SAS version
- Make sure you have specified an expiry time (the `se` parameter)
- And make sure it is far enough in the future!
- Specify at least one permission using the `sr` parameter
- r = read; a=add; u=update; p=process
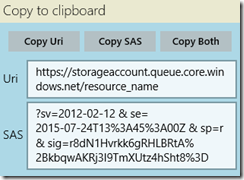
Using the SAS generated above, I would simply use the Copy Both button to copy the fully parameterized URL:
https://storageaccount.queue.core.windows.net/resource_name?sv=2012-02-12&se=2015-07-24T13%3A45%3A00Z&sp=r&sig=r8dN1Hvrkk6gRHLBRtA%2BkbqwAKRj3I9TmXUtz4hSht8%3D
And then adjust it per the Azure Queue REST API. For example, if I wanted to peek at 10 messages in the queue, I would modify the URL like:
https://storageaccount.queue.core.windows.net/resource_name/messages?peekonly=true&numofmessages=10&sv=2012-02-12&se=2015-07-24T13%3A45%3A00Z&sp=r&sig=r8dN1Hvrkk6gRHLBRtA%2BkbqwAKRj3I9TmXUtz4hSht8%3D
Other tips:
- When posting to the queue via the REST API, consider base64 encoding your text as the standard C# library and Visual Studio plugins require the text to be base64 encoded
- Refer to the Azure Queue REST API documentation and ensure you have included all parameters

Leave a Reply