Cheap HTPC with XBMC and IR

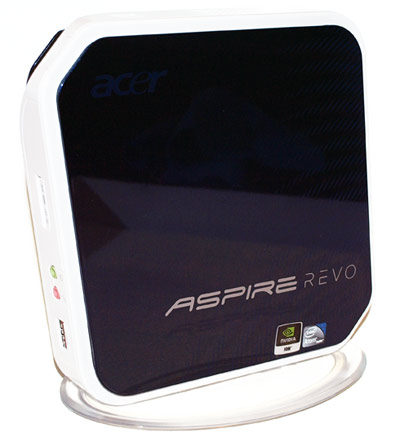
While browsing newegg the other day, I saw a nifty little gadget called a ‘nettop’ by the name of ‘Revo’. A nettop is essentially the desktop version of it’s cousin, the netbook. Similar to the netbook, the nettop is designed with lower power consumption, small footprint, and low cost in mind. Surprisingly, the Revo nettop (or Acer Aspire Revo AR-1600 as it’s formally known as) makes a decent Home Theater PC (HTPC).

revo_horizontal

**If you are just interested in figuring out how to setup the Revo for XBMC, skip down to the How To section.

***If you are looking for details on IR Server and how it helps with XBMC on Windows, check the XBMC for Windows IR Fix

Backhistory / Learning

I saw some reviews for the Revo on newegg where people had mentioned that they were running media center software (XBMC) on the device like a champ and it was playing 1080p High Definition content perfectly. I was really surprised to hear this since the Revo only has a small Intel Atom processor in it and the whole device consumes less than 30W of power. While the low processing power would typically mean this device is out of the question for high definition content (a similar downfall of the original Xbox 1 for which XBMC was developed), the Revo has something special up it’s sleeve: the Ion GPU.

nvidia-ion-logo-le_200The Ion GPU is a new (to me at least) technology from nVidia which can do hardware accelerated decoding of high-definition video. Typically, the media player software has to do software decoding of the video feed which requires a fairly powerful processor for decoding high defintion feeds. But because the Revo has the Ion chip it doesn’t need a strong processor and it can offload the video decoding via hardware acceleration onto the Ion chip.

This requires one major thing though – the software you are using you watch your video files must support hardware accelerated video processing. Luckily, the XBMC Live (bootable) distribution has VDPAU as one of the video decoding methods.  To test this concept out, I loaded up XBMC Live onto a thumb drive and some high definition videos onto another drive then headed into my local big box retailer to try it out. Sure enough, when I plugged in the XBMC drive and rebooted the revo it booted up to the splash screen for XBMC.

I double checked the VDPAU was selected then tried out some of my video clips. The non HD video clips and audio all played fine out of the box (after a change of the audio setting to “plug:hdmi”), but the real challenge was going to be some HD content. I opened up a 720p file I had on the second thumb drive and I was surprised to see that the video start playing with no hesitation. I checked the onboard stats of XBMC (via an ‘O’ keypress) and noted that the CPU utilization was very low (10-20%) which indicated that the Ion chip was doing it’s job.

xbmc_720_star_wars_590

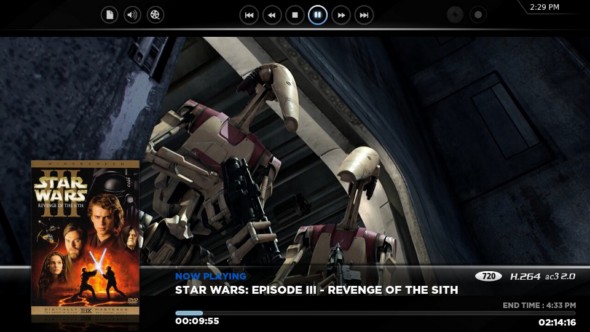
Take a look at the above screenshot showing Star Wars playing in 720p. The screenshot was borrowed from the XBMC Skins gallery and shows the ‘info’ option that can be pressed while watching a movie. The bottom part of the screen shows the traditional information such as time elapsed and remaining as well as some quick information about the movie such as resolution and movie-poster. Along the top of the screen you can see the options to control the playback of the movie as well as quick-buttons to adjust audio/video settings while the movie is playing.

The real test was 1080p content… which sadly the revo failed at. The statistics in XBMC showed that the CPU utilization was low, but for some reason the KILLA video clip was somewhat choppy.


What next?

After doing some more research, I’ve found a number of people saying a second stick of ram is required for VDPAU to fully work properly. Some people say this is because it lets you select 512MB of ram for the video chip whereas others say it’s because VDPAU requires dual-channel memory to run properly. I ordered a stick of memory and will post another update when I get it installed to see if it makes a difference on the 1080p content. Update: The 1GB of memory fixes the 1080p video stutter issue.


The Bottom Line

The bottom line is the revo quickly and easily stands itself up as a great (cheap) device for creating and easy and quick media player. It works great with all content up to and including 720p content, but does not work with 1080p content out of the box. Update: Adding 1GB of memory and adjusting video memory to 512MB makes 1080p work.

revo_stand

Also

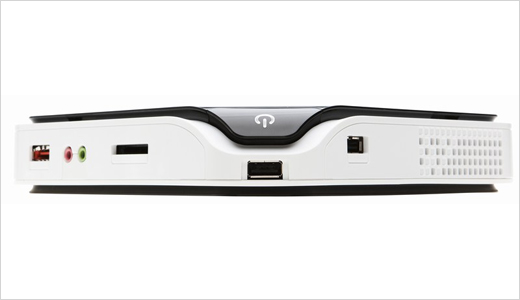
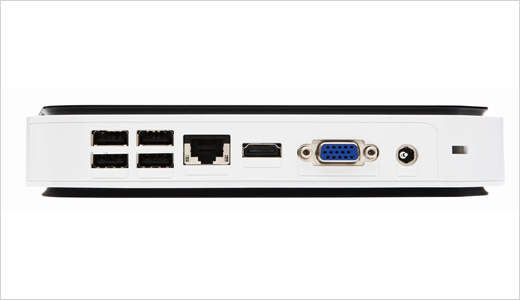
I should also note that the Revo comes with a 160 gig hard drive and Windows XP out of the box. It has an HDMI and VGA port, but does not have optical out (which doesn’t matter if you have a modern surround receiver). I installed Windows 7 under the stock configuration and XBMC for Windows runs easily under that (and the base XP installation). In a separate thread, I’ll shed some light on how to get HD content running in windows using MPC-HC and it’s hardware offloading technology.

revo_ports

Shopping List

How to Install

In this section, I’ll cover some of the details necessary to install XBMC Live directly on the Revo. It’s a short checklist now, but feel free to ask for details in the comments and I can add some updates. Also note that the XBMC 9.11 installer can keep your existing XP installation (just choose the repartition option when walking through the XBMC installer).

Software Required:

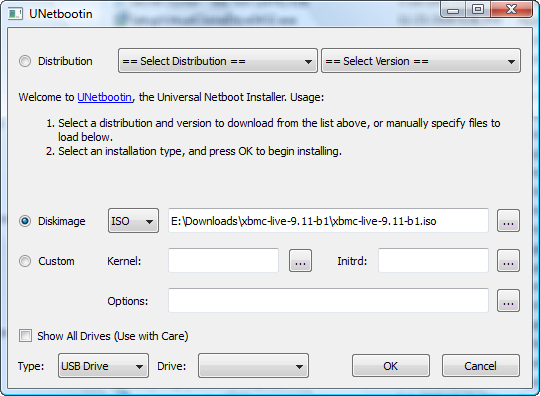
Installing to the USB Flash Drive

  1. Open Unetbootin and select the Diskimage button
  2. Click the … to the right of Diskimage and select the 9.11b iso
  3. Select your thumb drive from the “Drive” selector
  4. Click OK (and let the system extract the files to the thumb drive and make it bootable)
  5. When it’s complete, there is no need to reboot the system – just close out Unetbootin
  6. [Optional] Only for 9.04 and older: open the syslinux.cfg file and replace all instances of “boot=cd” with “boot=usb”. This is not necessary for the 9.11 versions.
  7. [Optional] If you don’t want to select the NVIDIA option every time, open the syslinux.cfg and replace the details in the “default” section with the details from the NVIDIA section. This will make it so the thumb drive will by default boot into the NVIDIA mode. Note: if you are not doing this for the REVO or another NVIDIA based system, skip this step.

2009-12-07_103648

Setting up the Revo (BIOS):

At this point, you should have a fully bootable USB flash drive with XBMC on it. You can take this to any computer and plug it in.

  1. Plug the USB Flash Drive into the revo and restart the Revo.
  2. Hit “Del” at boot up.
  3. Go to the Advanced section and make sure the iGPU memory setting is set to Manual with 512MB selected (only 256 will be available if you didn’t install the second memory chip yet)
  4. Optional: Change the boot priority so the thumb drive is first (above the built-in HDD)

Configuring XBMC:

At this point, the Revo should be setup to boot into XBMC with the appropriate amount of graphics memory available for the HD content to play. If you didn’t do the optional step of changing the boot order, you will need to press F12 to get into the boot menu and select your thumb drive from the list. If you did make the boot priority change then the revo should just boot right into XBMC (after going to the XBMC loader menu).

Let’s update the XBMC configuration to be optimized. Once you are booted into XBMC:

  1. Go down to the System menu item and press right, then click on the settings option
  2. Go down to the System item and select it.
  3. Go to the audio output section and change the output to Custom and enter “plug:hdmi” as the output type


Posted

in

by

Comments

15 responses to “Cheap HTPC with XBMC and IR”

  1. josh Avatar

    Adding the extra 1GB stick of memory fixed the issue with 1080p content. Adding the additional stick of memory allowed me to change the video memory setting in the BIOS to 512 and when I booted into XBMC Live and tried out some 1080p content it worked like a champ.

    I’m really excited about this because it means that you can have a 720p (high definition) for $220. ($199 Revo + $20 IR). Or drop in another 1GB stick of ram for $25 and you have a fully capable 1080p media center with an awesome interface.

    Also – I would highly recommend checking out the beta (camelot) version of XBMC (9.11) since it is really awesome.

  2. Dan Avatar
    Dan

    Hi, You can actually get a Revo with spdif out and 4gig ram and a dual core processor. its the 3600.

    Ive got oen of these running xbmc live like a dream (from hard disk).

    takes about 15 secs to boot up from scratch which is fantastic.

  3. Ryan Avatar

    Does step 7 matter if you are just going to install it to the Revo’s hdd? If not, after installing, will I need to update my own nvidia drivers?

  4. josh Avatar
    josh

    @Ryan
    No, it’s not necessary to do step 7 if you are going to install to the HDD. You can manually select the boot option if you want to. The reason you would change step 7 is if you wanted to continue to boot directly from the thumb drive and you didn’t want to have to manually select the NVIDIA option every time. In my case, I didn’t leave the keyboard connected while I was booting from thumb drive so this prevented me from having to plug a keyboard in each time I wanted to boot into XBMC from the thumb drive.

    I ended up installing XBMC Live directly to my hard drive and did NOT upgrade the nvidia drivers – the ones packaged with 9.11 Camelot were fine. I should also note that I was surprised (impressed) to see the option to automatically repartition my drive and keep the Windows installation that I had as part of the XBMC Live installer.

  5. Dave Avatar
    Dave

    Thanks for the great post. I have the Revo R3610- do I still need to upgrade the RAM?

    I tried booting XBMC Live (9.11) on my R3610 from a flash drive. It seemed to work OK, but I could not figure out how to access the local drives or external USB drive.

    I ended up installing XBMC in Windows 7 but have problems with stuttering and out-of-sync audio when playing 1080p (and some 720p, I guess depending on the bitrate). How can I offload to the dedicated Ion GPU in Windows?

  6. josh Avatar
    josh

    @Dave-
    No, you shouldn’t need the extra stick of RAM. The Revo 3610 has 2GB out of the box.

    If by ‘local drives’ you mean the Windows drives, then you are right that it will take some work. You would need to make sure you have NTFS support enabled in the linux system that powers XBMC Live and manually mount the drive. The other option is to install XBMC to the HDD and move your content into the XBMC folders instead of trying to access the Windows ones…or use the Windows options below.

    GPU offloading is not natively built into the XBMC windows build, but you do have some options:
    1) Use the DSPlayer build of XBMC ([url]http://xbmc.org/forum/showthread.php?t=61355[/url]). This is an experimental build, but my buddy with a 3610 is running it and loves it. It’s essentially XBMC for Windows with GPU offloading support.

    2) Use an external player ([url]http://xbmc.org/wiki/?title=HOW-TO_use_an_External_Player_for_media_playback[/url]) like MPC-HC ([url]http://mpc-hc.sourceforge.net/[/url]) (Media Player Classic – Home Cinema) which supports DXVA ([url]http://en.wikipedia.org/wiki/DirectX_Video_Acceleration[/url]) to play the files. With the latest builds, you will use the advancedsettings.xml method. I tried this method and did not like the fact that it took me out of the XBMC interface each time I wanted to play an HD movie.

  7. josh Avatar
    josh

    I just wanted to follow up to let you know it’s really easy to setup XBMC live to automatically mount your hard-drives – this includes the internal hard drive, the windows partition, as well as external eSATA or USB disks.

    You simply need to remove the “nodiskmount” flag from the boot configuration. If you are still booting from the USB stick directly, this will be in the syslinux.cfg file. If you have installed XBMC to disk, this is in the /boot/grub/menu.lst file.

    To remove this flag from the menu.lst file, telnet into the XBMC machine (use the instructions from the sabnzbd install post ([url]http://boshdirect.com/blogs/tech/how-to-install-sabnzbd-on-xbmc-live.html[/url]) if you don’t know how), then open up the file with your favorite editor:
    [code]sudo nano /boot/grub/menu.lst[/code] (you may have to enter your root username and password — typically xbmc / xbmc

    Arrow down to the first line under “## ## End Default Options ##” near the bottom of the file and on the “kernel” line arrow to the right until you see the “nodiskmount” text. Delete this text then press Ctrl+O [enter] to save the file then Ctrl+X to exit. Reboot your box and you should now see some new items in your file manager usually named something like sdb1 or sda1.

  8. Craig Avatar
    Craig

    Josh,

    Are all the xbmc options available with the IR remote? Can I delete a show from a share with the remote itself when I am done with a show?

    I’m very anxious to do this. Just waiting to pull the trigger (wife lost her job awhile back).

    Thanks,
    Craig

  9. josh Avatar
    josh

    All the options that I’ve ever needed are available with the remote. I use a Harmony One, so I have customized the remote so that the buttons fit my needs.

    I have mine set so the “Menu” button (DVD Menu on some remotes) opens the context menu which then gives me the option to remove the entry. If you are using the library mode, you will first need to enable the delete option in your system settings so that it will first prompt you to remove the item from your library then will ask you if you want to delete it as well.

    You can even program keymaps which can run any function on the XBMC device. Personally, I prefer to keep things simple and use the default out-of-the-box key mapping since it meets all of my needs.

    Let me know if you need any more details.

  10. Henrique Avatar
    Henrique

    When Revo is OFF, and you press POWER ON on your remote, does it turn on instantly? Or you need to SLEEP it to turn on again? Can you turn it on with a single button PRESS, or sometimes needs twice or three button presses?

    Because I had trouble with a USB IR sensor with by custom made HTPC. Even enabling USB wakeup in BIOS, I couldnt wake it up if it is not sleeping…

  11. josh Avatar
    josh

    @Henrique-
    I used the sleep function of XBMC to put the Revo into a low-power sleep mode. When using this mode, I can turn the Revo back on with a single button press. As far as I know, you can’t turn the revo on using IR (via USB) from a completely powerless state (eg. cold off). On the other hand, I didn’t really see any downside in leaving the revo in a standby state for my application.

    In fact, I now leave my revo on 24/7 since it consume so little power — this enables me to run other always-on applications / servers on it instead of running them on my power-hungry desktop.

  12. Michaelc Avatar

    Great article, with very clear instructions!
    I was wondering how hard it would be get the Revo/XMBC vombo to mount a directory from another computer on the network (in my case a Mac) and play media from it?

  13. josh Avatar
    josh

    @Michaelc- Streaming media over a network is one of XBMC’s strong-points. Check out the XBMC wiki post on configuring network shares ([url]http://wiki.xbmc.org/index.php?title=Configuring_PC_Shares#Macintosh_.28Apple_Mac_OS_X.29_Sharing_Alternatives[/url]) for how you would do this.

    You can find more technical details on this XBMC Wiki post ([url]http://wiki.xbmc.org/index.php?title=XBMC_Features_and_Supported_Formats/Codecs#Supported_physical_input_media_formats_and_devices:[/url]). For a quick technical reference, this includes a number of methods: PnP, SMB/Samba/CIFS, FTP, HTTP, XBMSP, and iTunes (via DAAP).

  14. Sean Avatar
    Sean

    Great info, thanks!

  15. josh Avatar
    josh

    I’ve received some questions recently regarding mounting of hard drives, so I just wanted to make sure everyone was aware that I’ve posted some other blog posts regarding this topic:
    XBMC Live Drives Mounted with Odd IDs ([url]http://boshdirect.com/blogs/tech/xbmc-live-drives-mounted-as-odd-ids.html[/url]) — includes some instructions on how to manually mount drives with FSTAB. This is the method that I use now.
    Set XBMC to Automount Drives ([url]http://boshdirect.com/blogs/tech/set-xbmc-to-automount-drives.html[/url]) — includes some details on what I’ve observed regarding automounting of drives on various versions of xbmc / ubuntu.

Leave a Reply

Your email address will not be published. Required fields are marked *